The premiere Etage in a French home is the second floor in an American home, and generally speaking is where the bedrooms and bathroom will be located – or in France, the chambres and salle de bain. LaRoseraie had three bedrooms on this floor and one bathroom – well, sort of…
Chambre One was a jewel from the start. The walls were ensconced with beautiful mouldings and was a big part of stealing our hearts from the first day. It was a large room with a big, beautiful window and a fireplace, but had a few issues. The first was the two venetian glass doors that flanked the bed wall – one went to a passageway into chambre two and the other was a false door, which we assume was there to create symmetry with the other door. There was also a third redundant door to the left of the entrance door that had presumably been a former means of exiting the room via a partition in the entrée to allow a former madam to make a quick exit to the bathroom across the entrée hall while still in bedclothes. We opted to leave the latter in place, but affix it permanently shut and to remove the two venetian glass doors, along with the passageway, then refinished that wall – adding mouldings to match the existing.


Fear not! The two Venetian glass doors would not go to waste, as I had committed to saving every possible detail of this house. They were repurposed as new doors to the two toilette rooms and have added a special charm in both locations.


What you will not notice is the extent of restoration needed to the wall mouldings – the original ones were in worse condition than we initially realized and then additional, extensive damage was caused when the ceilings were replaced, so roughly half of the wall mouldings are actually new – and once the painters were done with them they looked better than they likely looked even when they were new. As I stated before – if you find a really good painter, they will be worth their weight in gold! After completion, chambre one is the most sought after room to stay –


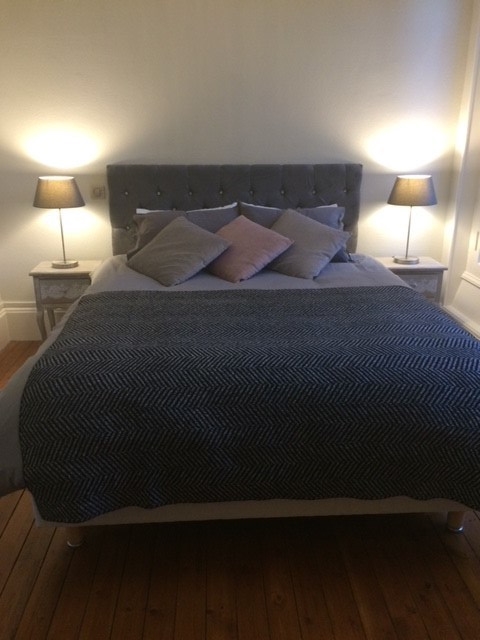
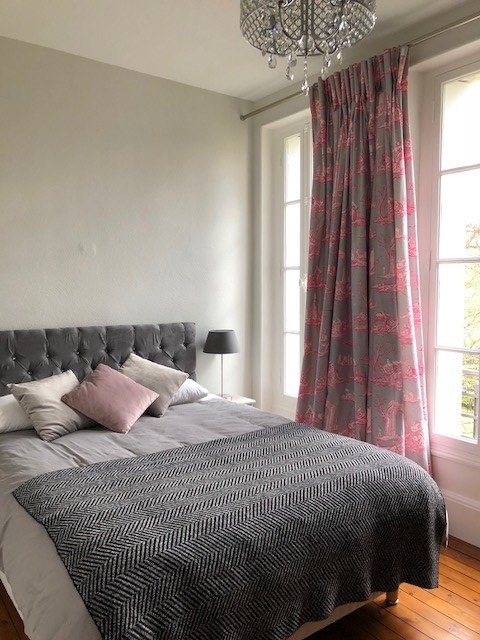
The other major work needed on the premiere etage were the damaged ceilings from a roof leak that had been resolved when the roof was replaced 10-15 years ago. What had not been resolved were the damaged ceilings. The best solution here was to add a layer of steel framing studs, then attach a layer of plasterboard. This would both support the structure and fully repair the ceilings’ integrity. All carpets were removed, all wallpaper was removed, walls were repaired, then covered in a layer of textured fiberglass and painted. The floors were repaired, sanded, stained, and then varnished. New base trim was added throughout to add a touch of elegance and better proportion, and all electrical was replaced with the addition of recessed lighting and chandeliers in each chambre. Though each chambre has a fireplace – only the ones in chambre 1 & 3 are potentially useful. We intend to have each fireplace inspected and will consider gas inserts at a future time if possible.
Chambre Two was equal in size to chambre one but with no ornate wall details. Instead, our obstacle in this room was concerning the passageway that had been used to traverse between chambers’ one and two and the fact the bulk of the water damage had been focused in this room. Add to that, at some point in time this was the one section of the house that had settled a bit, so the fireplace had been cemented closed, presumably because it was rendered unsafe. Since we do not plan to use the fireplaces with possible exception to one day retrofitting a few with gas inserts for ambiance and some supplemental heat, this was not a problem for us. The first order of business, however, would be to remove the passageway and relocate the radiator, then repair the ceiling, walls, floor, windows, etc., add the base trim and ready it for final finishes.
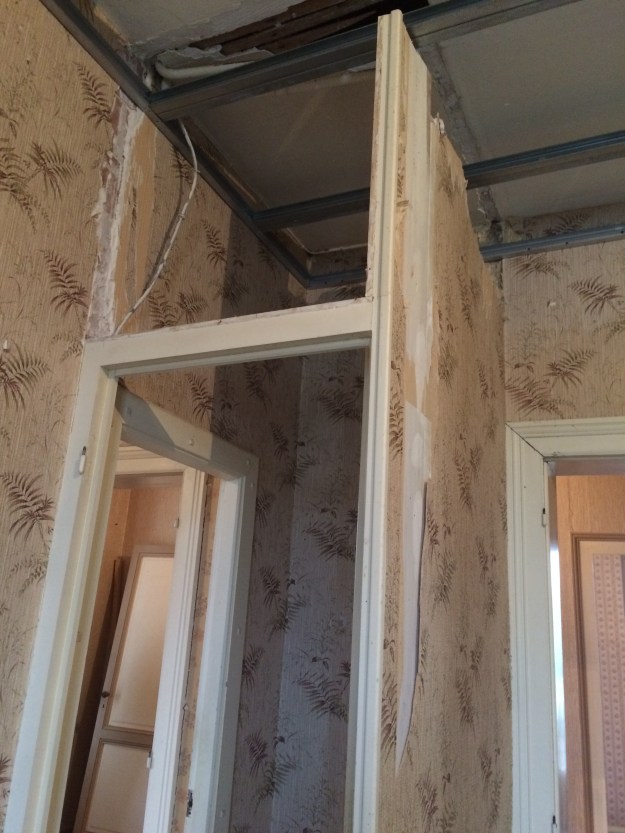


Chambre 2 had the greatest challenges with its ceiling and the fact it had an unnecessary passageway to chambre 1 – the first order of business was to restore the ceiling, then remove this passageway. The floor was also in terrible condition from both water and insect damage. Intent to maintain as much original material as possible, we needed to have several boards replaced. Once all was sanded, stained and varnished, it looked just fine!


Chambre 2 has the flexibility to have either two single or one king sized bed.
Chambre Three had few obstacles – it was a simple means of a new ceiling, fiberglass and paint on the walls, new electrical, new floor finish, and base trim.


Once completed, despite being the smallest of the three chambres on this floor, it carries a charm that is uniquely Parisian –


The Premiere Entrée before:
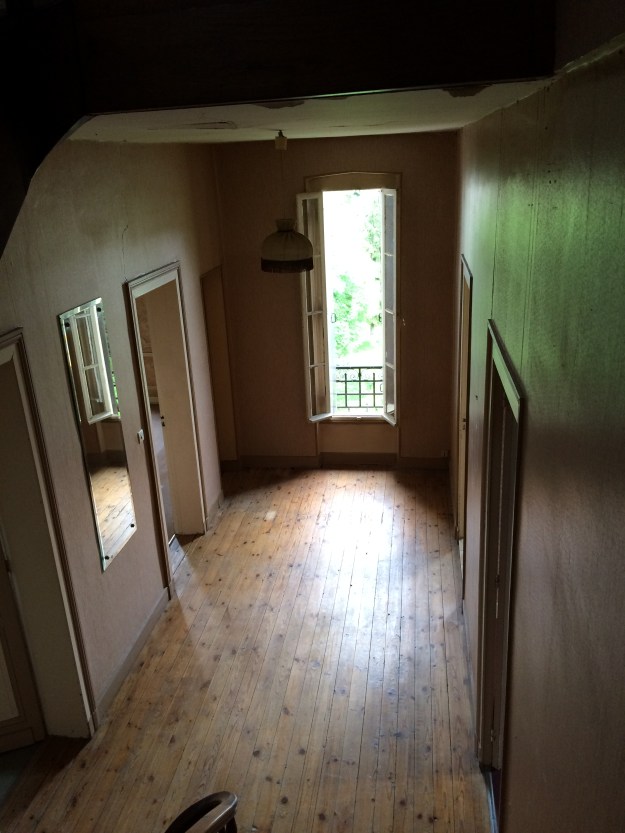
As you can see – from the crumbling ceiling down to the worn floors, this once beautiful space had lost its luster – so it received the star treatment of new ceilings all the way down to refinished floors.
The Premiere Entrée After:

It was our intent to not only retain as much original detail as possible, but to ensure the finishes and material in the entrees and stair were maintained in the style characteristic of its period. I found the restored French vintage chandeliers online, the vintage mirror was sourced from Maison du Monde and the draperies were custom made with a vintage Berger fabric by a local artisan.
The final room on this floor would be the salle de bain. Originally, it housed a bathtub with hand shower, a wall-mounted sink and a bidet. All of the plumbing had been attached to the exterior wall of the house since the bathroom had been added a number of years after the house was built, so one of the tasks would be to bring this inside for future protection from the cold and potential freezing temperatures.
Salle de Bain Before:


Salle de Bain During:
Once the tile, fixtures and old plumbing and electrical were removed, the task could begin to repair and prepare the surfaces for new finishes. One thing to note with a house of this construction – not only are all exterior walls stone block, but the primary interior walls will also be stone. Any walls that were constructed thereafter would most likely be clay tile covered with plaster. The difficulty occurs when blocking is required for fixtures, radiators, etc. since these substrates provide poor strength for anchoring weighty hardware. We had one such case in this bathroom. The electric radiator had been attached to the clay tile wall and after a few months, dislodged and fell off the wall. The remedy was to add to the porcelain marble-look tile to cover the area behind where the radiator would attach to provide a stronger surface for the wall anchors. In hindsight, we should have opened the wall, added blocking, then plastered over.


Salle de Bain After:
As you can see, our objective was to give this bathroom/SDB a more vintage feel than we designed for the second floor bathroom/SDB. The primary components were the utilization of natural materials such as the white marble and charcoal slate floors, and vintage styling through the fixtures where we utilized porcelain and chrome. The light fixtures also lend a vintage feel, although you’ll notice the ceiling fixture is, in fact, original to the house – it is the ceiling fixture that was in the ground floor entry, re-purposed to add the perfect finishing touch.


Now complete – this bathroom has a large walk-in shower, an oversized sink vanity and a toilette.
